Radon is a potential threat in homes across the globe. If you’ve got high sensor readings, it’s time to learn how to get rid of radon. Due to differences in air pressure, radon can be drawn into your home from the surrounding soil. This gas can seep through cracks in the foundation and other openings, potentially becoming trapped inside.
Since radon is colorless, odorless, and ubiquitous, specialized sensors are essential for detection. Due to its radioactive nature, radon poses a significant health risk, with the CDC stating, “There is no known safe level of radon.” The EPA also estimates that approximately 1 in 15 homes in the US have elevated radon levels (above the recommended action level of 4 pCi/L). Furthermore, radon levels vary greatly due to underlying geology, making understanding your area’s risk crucial.
The only way to know if your home has high radon is to test. When I discovered high radon in my home, I was determined to safeguard my family. By understanding how to fix high radon level problems, you can do the same and create a healthier living environment.
Let’s explore these radon solutions in detail.
What Is Radon? (and Which Type is the Most Dangerous Indoors?)
Radon is a colorless, odorless, and tasteless radioactive gas that occurs naturally in the environment. It is a byproduct of the decay of uranium in soil, rocks, and water. While naturally occurring, radon is a toxic gas.
Radon-222: Most Common Radon and the Most Dangerous to Human Health
Different radon isotopes exist, but radon-222 is the most common and dangerous form. Radon-222’s danger lies in its decay rate, but not because it decays quickly. The problem is its decay rate is slow enough for radon-222 to accumulate inside homes but fast enough to emit a steady source of harmful radiation.
This specific decay rate is problematic for three main reasons:
How Radon Gets into Your Home (and Why It Stays)
The 3.8-day half-life of radon-222 means that while it does break down, it does so slowly enough that new radon is constantly entering from the soil, leading to a potential buildup in homes. It’s like filling a leaky bucket – the leak is slow, but the faucet is always on.
Common Entry Points for Radon (and How it Gets Stuck)
Radon primarily comes from the ground beneath your home. It most frequently enters a house through cracks in solid floors, construction joints, gaps around service radon pipes in the basement, cavities inside walls, and other openings in the foundation. Windows, drains, and spaces around cables can also be entry points.
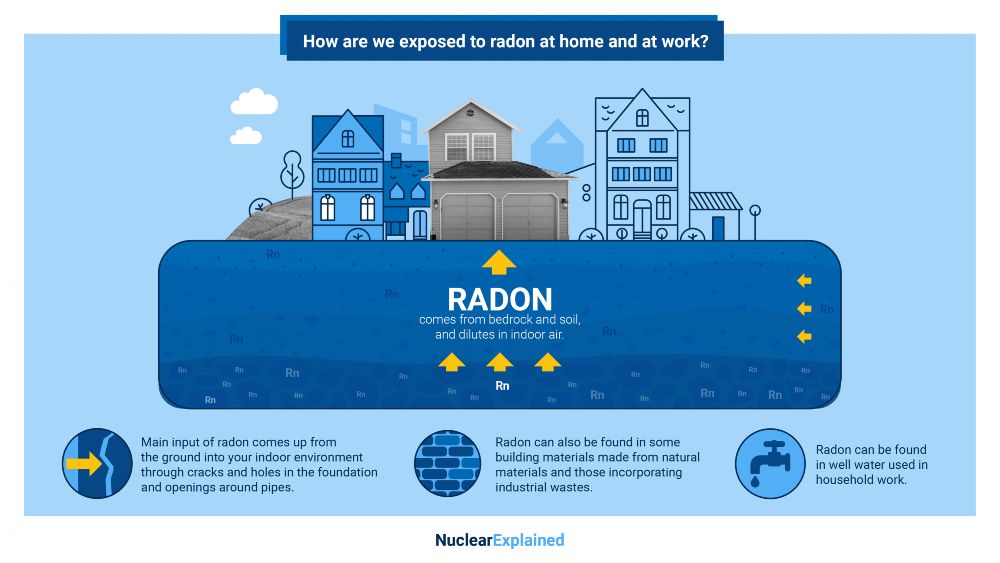
Radon entry occurs due to the pressure difference because homes are typically at a slightly lower pressure than the soil underneath. This pressure difference draws radon into the building. Unlike outdoors, radon indoors can’t quickly dilute within enclosed spaces, leading to potentially dangerous buildups – making it a significant source of radiation exposure.
How Radon Damages Your Lungs and Increases Cancer Risk
Although it takes 3.8 days for half of the radon to decay, the radioactive gas emits harmful radiation throughout that period. The longer radon-222 is present, the longer your lungs are exposed to radiation. This radiation can damage the lining of the lungs, and prolonged exposure significantly increases the risk of developing lung cancer.
| Did You Know?
Radon is the second leading cause of lung cancer after smoking. Smokers are particularly vulnerable, with roughly 1 in 3 developing radon-induced lung cancer compared to 1 in 20 for non-smokers. |
Key Takeaway
Radon poses a critical health risk, and because it cannot be detected by human senses, it’s essential to have your home tested. If high levels of radon are found, there are effective mitigation techniques to reduce your exposure and protect your health.
The seriousness of the radon issue is underscored by the fact that January is designated National Radon Awareness Month. This annual campaign emphasizes the importance of testing your home for radon and taking action if high levels are found.
Important Note: Due to its prevalence and danger, from this point on, the term “radon” will refer specifically to radon-222 unless otherwise stated.
Testing for Radon: How to Determine if Your Home is at Risk
Is radon testing really necessary? Yes! Testing is essential to determine if your home is at risk of high radon levels. Radon testing can be done using do-it-yourself test kits or hiring a professional radon testing service.
Focus your testing on the lowest level of your home where people regularly spend time. Radon doesn’t need to be measured in attics or storage areas.
Testing Options:
- DIY Test Kits:
- Simple and affordable.
- Follow the kit’s instructions for placement and timing.
- Mail the kit to a lab for analysis.
- Professional Testing:
- Offers more precise results using specialized equipment.
- May use continuous monitors or specialized collection methods
Find step-by-step instructions on how to use a radon test device in your home in this CT resource: Radon Testing Checklist For the Home
Ways on How to Get Rid of Radon in Your Home
Radon levels in a home cannot be completely eliminated, but they can be significantly reduced with effective mitigation. Below are a few methods how to lower radon levels:
Radon Gas Removal: Do-it-Yourself (DIY)
Before you start tackling radon mitigation, understanding your home’s specific situation is key. Complete this quick pre-checklist:
Pre-Checklist:
- Get an Initial Radon Reading: Choose a long-term radon detector. This provides a baseline level and lets you track the effectiveness of your mitigation efforts over time. They’re also more cost-effective in the long run than multiple short-term tests.
- Assess Your Foundation
-
- Age: Is your home pre- or post-1970s construction? This helps you anticipate the density of the fill beneath your slab (porous vs. dense).
-
- Structure
-
-
- Does your home have additions that might have separate foundation slabs, requiring multiple mitigation areas?
- Are there existing drainage systems you can utilize?
- What is your soil composition?
- Can you determine the type of fill used?
-
Now, let’s explore some DIY methods you can implement to reduce radon levels in your home. Here are some DIY radon mitigation techniques:
Step 1: Sealing cracks and openings
Identify and seal any cracks or openings in the foundation, walls, floors, and crawlspace. This can help prevent radon entry into your home.
Identifying Areas to Seal
Carefully examine where radon mitigation pipes enter your foundation or walls. Seal any gaps around these pipes with expanding foam or caulk. Check your radon mitigation system sump pump (if you have one) for a tight-fitting lid, and consider venting it outdoors. Finally, gaps in construction joints should be looked for, and the seal should be made with concrete sealant.
Choosing Materials and Scope
For smaller gaps and easily accessible areas, using a caulk, foam, or epoxy sealant labeled for radon sealing can be a DIY project. For larger gaps, hard-to-reach spots, or if you need sump venting modification, consult a radon mitigation professional or an experienced contractor.
Step 2: Improve ventilation
Increase the ventilation in your home by opening windows (including basement windows), installing fans, or using air exchangers. Proper ventilation can help dilute radon levels.
| Important Reminders
While these DIY techniques can effectively reduce radon levels, it is important to monitor radon levels regularly to ensure that they remain within a safe range. If you’re unsure about sealing techniques or if radon levels remain high, consult a qualified radon mitigation professional for guidance. |
How to Fix Radon Problems in Basements and Crawlspaces
Basements and crawlspaces are common radon entry points due to their contact with the soil. If you detect high radon levels in these areas, hiring a professional radon mitigation company is the most effective and reliable solution.
Why Choose a Professional
- Expertise: Radon mitigation companies specialize in understanding radon entry points and designing systems to remove it safely.
- Tailored Solutions: They assess your specific home and design a mitigation system that best addresses your situation.
- Compliance: Professionals ensure your system meets local building codes and regulations for safety and effectiveness.
Finding the Right Professional
- Certifications: Look for contractors certified by organizations like NRPP or NRSB.
- Experience: Ask about their experience in homes similar to yours.
- Reviews: Check online reviews or ask for references.
- Quotes: Obtain multiple quotes to compare costs and systems.
List of Radon Professionals:
- CT: https://portal.ct.gov/dph/environmental-health/radon/radon—-for-professionals
- NRPP: https://nrpp.info/pro-search/
- NRSB: https://nrsb.org/find-a-pro/
Pro-tip: Before hiring a professional, it’s helpful to have questions prepared. Check out this resource for guidance on what to ask: https://c-nrpp.ca/homeowners/steps-to-reduce-radon/
Professional Assessment and Mitigation: Installing Radon Mitigation Systems
A radon mitigation professional will assess your basement or crawlspace to pinpoint the specific routes of radon entry. This typically involves examining cracks, gaps, sump pumps, and exposed soil (in crawlspaces).
Based on this assessment, they will install a suitable radon mitigation system (also called a radon reduction/remediation system). There are different types of radon mitigation systems, but the most common type works by creating a pressure difference between the soil and the interior of your home and directing radon gas away from your living spaces.
But, how does a radon mitigation system work?
Typically, it works by creating a pressure difference between the soil and the interior of your home and directing radon gas away from your living spaces.
The options are the following to eliminate radon in your house:
- Sub-slab Depressurization: Think of it like a vacuum cleaner for the ground under your house. A pipe is inserted into the soil beneath your basement, and a fan attached to the pipe pulls radon gas out and blows it safely away from your home.
- Crawlspace Depressurization: In homes with crawlspaces, a thick plastic sheet is laid over exposed soil to trap radon gas. A special system with a fan pulls the radon from under the sheet and releases it outdoors, preventing it from entering your living spaces.
Additional mitigation methods, such as ventilation improvements or heat recovery ventilators (HRV), sometimes called air-to-air heat exchangers, might be recommended depending on your home’s specifics. An HRV will increase ventilation by introducing outdoor air while using the heated or cooled air to warm or cool the incoming air.
| How effective are radon systems?
Mitigation systems are highly effective when designed and installed correctly. Proper maintenance can reduce radon levels by up to 99%. |
Prevent Radon Problems Before They Start: Radon-Resistant Construction for New Homes
Radon poses a risk in both new and old homes. You can significantly minimize your future radon risk by incorporating radon-resistant construction (RRC) techniques during the building process.
Key RRC Components:
Gravel Layer
A coarse gravel of a 4-inch layer or a similar material is placed beneath the foundation (slab). This creates what builders call an “air flow layer” or “gas permeable layer,” allowing soil gases like radon to move freely and reducing the amount that seeps into your living spaces.
Vapor Retarder or Plastic Sheeting
A heavy-duty plastic sheet (typically 6 mil polyethylene) or specialized vapor retarder is placed over the gravel layer. This acts as a barrier to block radon and other soil gases from entering the home and helps prevent moisture from seeping up through the foundation. These techniques help reduce moisture buildup, preventing mold and mildew that negatively impact indoor air quality.
Radon Vent Pipe
A solid PVC pipe (typically 3-4 inches in diameter, Schedule 40) is installed vertically from the gravel layer up through the house’s interior and extends above the roofline. This pipe, similar in appearance to plumbing vent pipes, creates a dedicated pathway to safely vent radon and other soil gases out of the home.
Additionally, radon vent pipes can help vent other soil gases, like methane or volatile organic compounds (VOCs), further improving the air you breathe.
Junction Box
An attic electrical outlet allows for easy fan installation if future radon tests reveal the need to convert the system from passive to active.
Additional Protection in High-Radon Areas
Soil Gas Retarders
In areas with exceptionally high radon potential, a specialized membrane may be installed beneath the foundation as an additional layer of protection. These soil gas retarders provide a more robust barrier against radon and other soil gases compared to standard plastic sheeting:
- Materials: Soil gas retarders are typically made from high-performance plastics like high-density polyethylene (HDPE) or polyvinyl chloride (PVC), designed for excellent durability and puncture resistance.
- When to Consider: Soil gas retarders may be recommended in conjunction with other RRC techniques when:
- Building in an area with very high radon levels
- Soil conditions make creating a sub-slab gas permeable layer difficult
Important: Consult with your builder or a certified radon mitigation professional to determine if a soil gas retarder is necessary for your new home construction.
Zone 1 Homes
If you live in a high-radon area (EPA Zone 1), installing a fully active system during construction is often the best approach for maximum protection. Ensure your RRC plan includes the following:
- Capillary break
- Attic electrical outlet for potential fan installation
- Properly sized and installed vent pipe
Here are the counties with predicted average radon levels at or above the EPA’s 4.0 pCi/L action level:
| Albany | Delaware | Oneida | Schuyler |
| Allegany | Dutchess | Onondaga | Steuben |
| Broome | Erie | Ontario | Sullivan |
| Cattaraugus | Genesee | Orange | Tioga |
| Cayuga | Green | Otsego | Tompkins |
| Chatauqua | Herkimer | Putnam | Ulster |
| Chemung | Lewis | Rensselaer | Washington |
| Chenango | Livingston | Saratoga | Wayne |
| Columbia | Madison | Schenectady | Wyoming |
| Cortland | Montgomery | Schoharie | Yates |
For detailed guidelines and information on RRC, refer to the EPA’s guide: https://www.epa.gov/sites/default/files/2014-08/documents/buildradonout.pdf
Taking Action to Protect Your Home and Family From Radon
Radon is a silent and invisible threat that can have serious health consequences. Understanding the risks associated with radon exposure and taking appropriate action is crucial in protecting your home and family.
If you suspect that your home may have high radon levels, don’t wait. Take action now to protect your loved ones. Test your home for radon and consider implementing radon mitigation techniques. Remember, every step you take towards reducing radon levels in your home is a step towards a healthier future.
Further reading:
- Should You Be Worried About Radon in Your Home?
- Radon Test Kits vs. Electronic Air Quality Monitors: Which is Right for You?
- Toxic Gases Inside: The Perils of Radon and Carbon Monoxide
- Radon Awareness Month: Protect Yourself from the Silent Killer
Frequently Ask Questions
How common is radon in homes?
Radon is present in homes throughout the US. The EPA estimates that about 1 in 15 homes have elevated radon levels above the recommended action level.
What should radon levels be after mitigation?
The EPA recommends aiming for radon levels below 2 pCi/L after mitigation.
How long does radon mitigation take?
Most installations can be completed in a single day.
How long will radon levels drop after mitigation?
You should see a significant reduction in radon levels within 24-48 hours of system activation. Retesting after a few weeks will confirm its effectiveness.
How to get rid of radon naturally?
Unfortunately, there are no reliable ‘natural’ ways to fully get rid of radon. Opening windows for better ventilation can help slightly, but professional mitigation is often necessary for significant radon reduction.
Do new homes have radon systems?
Not always. While some new homes are built with radon-resistant features, a mitigation system may still be needed. Testing is vital, even in newer construction.
What factors impact the speed of radon removal?
Factors like the initial radon level, home size, soil type, and the mitigation system design all influence how quickly radon is removed.
Is it safe to buy a home with radon?
Radon can be mitigated, so a home with high radon isn’t automatically unsafe. Make any purchase offer contingent on successful radon testing and mitigation if needed.
Do radon mitigation systems require maintenance?
Yes, but minimal. Annual inspection of the fan and piping is typically recommended to ensure the system remains effective.
What impacts the cost of radon mitigation?
The price of mitigating radon varies based on several factors, including
- home size and design (larger homes and those with complex layouts generally require more involved systems),
- foundation type (crawlspaces or slab foundations can present different challenges),
- local conditions (climate and regional material/labor costs), and
- visual considerations (hiding the system inside may cost more than an external vent pipe).